Friday, 1 February 2019

Lavangam Stitch / Long French Knot / Pistil Stitch

Lavangam Stitch / Long French Knot / Pistil Stitch

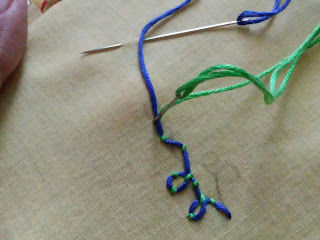
Lavangam stitch is also known as Long French Knot / Pistil Stitch.....it is a variation of French knot. This is a simple and easy stitch which even begginer's can try. I have used three stands of Anchor threads for this stitch. This stitch can be used as a border or for flowers even as straight line.


Things required are:
1. Fabric / Cloth
2. Needle
3. Thread
4. Hoops

Method:
# Draw a pattern or design....put a knot in the thread, take the needle under the fabric.... keep your thread towards your left....hold it with your thumb finger twist your needle twice or thrice with the thread (as we do for our french knot) leaving some space place the needle and pull the thread down....as shown in the below pictures.


The back side of the Lavangam stitch would look like this:


Put a knot at the back side or your stitch.

Please do try and provide your comments.
Thank you!


Friday, 4 January 2019

Chumki Work!

Chumki Work!
Chumki Work is a decorative stitch which is used in borders or outline or even in any design or pattern. Today I am sharing a very simple and easy chumki work which is also called as Sitara work.


Chumki Work can be done with any stitch, today I am sharing back stitch chumki Work. You can use same colour threads and chumki or contrast  colour or even lighter shades of threads that match your chumki.
Things required:
Fabric
Needle
Thread - I am using Anchor thread
Hoops
Chumki / Sitara

Steps and instructions of Chumki Work:
# Draw a line or design.

# Put a knot in thread. 

# Take the needle under the fabric and start with running stitch. Leaving little space take the needle under the fabric and place your chumki and pull your thread.


# Bring your needle to the previous stitch where it ended. 


# Just next to chumki take the needle under the fabric again bring to the previous stitch where it ended ( middle of the chumki).

# Repeat this process. As we do our back stitch.


# In the end bring your needle down and put a knot.
# Back side of chumki work will look like this.
This stitch can be used in kurtis, sleeves of tops, borders, etc.

Please do try and provide your comments.
Thank you!

Thursday, 20 September 2018

Square Mirror Work

Square Mirror Work
A very simple mirror work, which begginers can try. We can do this particular mirror work without glue, gum or fevicol. We can decorate this square mirror work with beads or with any simple stitch. I have used French knot stitch to decorate my square mirror work. I always like to use contrast  colours of  threads in my  embroidery work.


Things required are:
1. Square Mirror
2. Fabric
3. Hoops
4. Threads
5. Needle.

Method:
# We can use small, medium or big mirror for this work. Place your mirror, press you thumb in the centre of the mirror and start your work as shown in the picture.


# While finishing put a knot in the back side of your mirror work.

# Decorate your mirror work with simple stitch or bead work.

Please do try and provide your comments.
Thank you!

Thursday, 5 July 2018

Couching / Couch Stitch

Couching / Couch Stitch
Couching or Couch Stitch is a basic stitch in embroidery. We can use this stitch as a straight line, curves, free hand patterns. I would call this stitch as a begginer's stitch. Gendrally we use two different / contrast colours of threads. But if you wish you can use same colour of threads.


Things needed are:
1. Fabric
2. Needle's - 2 nos
3. 2 different colours of threads
4. Hoops

Steps and instructions:
# Draw a pattern or design.

# Put a knot in the thread...take the needle under the fabric...which is the laid thread or we can call it as surface thread.

# We need to put a knot in another thread or contrast colour thread .... which is our working thread...take the working thread above the laid thread to form the couch stitch.


# Once you finish couching, bring the needle below the fabric and put a knot.

We can do number of variations in couching. Today I am sharing a basic or simply couch stitch. Hope you all like it!
Please do try and provide your comments.
Thank you!

Thursday, 17 May 2018

Twisted Chain Stitch

Twisted Chain Stitch
Twisted Chain Stitch is a variation of regular chain stitch. We need to twist slightly to get this Twisted chain stitch.


This stitch can be done for outline, border, curves, straight line, any pattern or design. It is also called as decorative stitch.
Things required are:
1. Fabric
2. Hoops
3. Needle
4.Thread

Steps with pictures are shown below:
# Draw a pattern or design. Today I am
using Anchor threads for this stitch.
Before starting the stitch, we can draw another line parallel to the pattern or design or keep small dots, as I have done in the following picture.....this is specially for beginners, so that we get same size of twisted Chain Stitch.


# Put a knot in the thread.... bring the needle from ( down the) fabric.....and start from the parallel dot...to the previous line adjacent....


# Bring the thread under the needle and pull the thread as we do for regular chain stitch.


# Once the first twisted chain is formed, place the needle next to the stitch... parallel dot and continue your stitch.

# Once you finish, bring the needle down the fabric as we do our regular Chain Stitch and put a knot in the bakeside.


Please do try and provide your comments.
Thank you!